Tuesday, August 31, 2010

Homemade Dog Food

A few years ago we decided that we weren't happy with what was on the market to feed our dogs.  Any food that I found at a reasonable price included ingredients I wouldn't want to feed anyone.  When we looked into healthy, more expensive food, it was just to expensive.  So after doing a lot of research, I adapted a few recipes to make what we feed them now.  It is healthier, cheaper and has no added chemicals like in processed dog food. Plus they love it!  They get fed this for dinner and a high quality kibble is down during that day (Taste of the Wild)


  • 1/4 Cup Extra Virgin Olive Oil (Evoo)
  • 2 lbs Ground Turkey
  • 1/2 Cup of whole Oats
  • 2 tsb. Dry Parsley
  • 1 1/2 lbs Carrots - Peeled and sliced thinly
  • 1 1/3 Brown Rice (uncooked)
  • 7 Cups of Hot Water
1.  Heat Evoo in a large pot
2.  Add Ground beef, stir and cover. Reduce heat to low


3.  Cook until done, break into loose meat (I use a potato masher)


4.  Add Carrots and Water. Stir, Cover, turn heat to high and bring to boil 


5.  Add Rice, Parsley, Oats. Stir, Cover, Return to boil then Reduce heat

Jack and Jill patiently waiting for me to get done cooking.

6.  Stir every 10 minutes for 40 minutes
7.  Uncover and cook for 10 more minutes.


This feeds our two small dogs for 6 days. I reheat it in the microwave each night and mix in a doggie vitamin in daily.

    Tip Tuesday

    Each Tuesday, I will feature a tip or two on cooking. This week, we have two basic tips that are very important about searing meat.  If you master searing meat properly, your steaks, pork chops and chicken breast will have a deeper flavor and a delightful crunchiness.

    •  When heating oil in a pan to sear meat or fry anything, make sure to check to see if the oil is hot enough before adding anything to the pan. Check one of two ways:
      • Place the top of a wooden cooking tool into the oil; if you see bubbles, you're good to go.
      • Drip a very small drop of water into the oil. Again, if you see bubbles, you're good to go! Just make sure not to add more then a drop, or else oil will splash all over
    • Before adding meat to a pan, dry both sides with a paper towel. For the longest time, I couldn't understand why my meat was not getting a good sear. It was because I wouldn't dry the meat!

     If you're oil isn't hot, and your meat isn't dry, then you'll be missing out on that yummy caramelized crust. Remember that a seared piece of meat will require further cooking because it will still be raw in the middle.

    Monday, August 30, 2010

    Money Saving Monday


    A few people have commented on the amount of money that I am going to save by ditching takeout for home cooking. I’ve decided to make this all a little more difficult, and up the stakes by sticking to a $100 weekly budget.

    A Hundred Dollars Covering:

    • 2 People – 3 meals a day – 42 meals a week

    • All the needs for two dogs and one cat

    • All household supplies. Ex: Toilet Paper, Soap, Shampoo

    • Sale items that I will use in future weeks

    I’ve mentioned before, I am an extreme coupon shopper. So fortunately, I have a nice start with the stockpile of food I have build in our pantry. Each week, on Monday, I will show you just how far I’ve been able to stretch my $100 with coupons. And hopefully, I’ll be able to spend less then that!

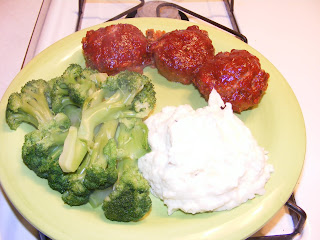
    Turkey Meatloaf Muffins


     Last night I made Rachael Ray Meatloaf Muffins with Barbecue Sauce.  Because of all of the great reviews on this recipe, I thought that it was going to be great. The recipe was moist and the salsa BBQ mix was great but overall I was a little disappointed. I did use ground turkey, instead of beef, and added a clove of garlic, but this was not the problem in the recipe.  Because of the short cooking time, in some bites there was an obnoxiously strong onion or celery flavor, along with a crunch.  That is not personally something I like in a meatloaf. Although I like the idea of a muffin, along with a shorter cooking time, the oil the coat the muffin tin was unnecessary. The oil made a huge mess bubbling over into my oven. Next time I would definitely use a cooking spray instead. See the changes I would make next time, noted below!

    • 1 2/3 to 1 3/4 pounds ground sirloin (I used ground turkey)
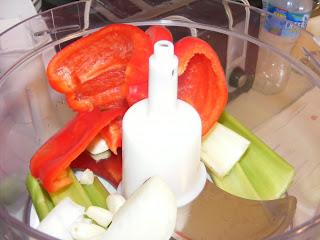
    • 1 medium onion, cut into chunks
    • 2 ribs celery from the heart of the stalk, cut into 2-inch pieces
    • 1 green bell pepper
    •  3 Garlic cloves (not used in original version)
    • 1 large egg plus a splash of milk, beaten
    • 1 cup plain bread crumbs
    • 2 tablespoons grill seasoning (recommended: Montreal Steak Seasoning by McCormick)
    • 1 cup smoky barbecue sauce
    • 1/2 cup tomato salsa
    • 1 tablespoon Worcestershire sauce
    • Vegetable oil or extra-virgin olive oil

    1.  Preheat oven to 450 degrees F.
    2.  Put onion and celery into a food processor. Cut the bell pepper in half, rip out the seeds and throw them into your garbage bowl. Cut the pepper into a few pieces and add to the food processor. Pulse the processor blades to finely chop the vegetables into very small pieces.  (I would change this next time.  I would saute the vegetable before adding them to the mix)


     3.  Add vegetables, meat, egg beaten with milk, bread crumbs and grill seasoning into a big bowl.


    4.  Next, mix together the smoky barbecue sauce, the salsa and the Worcestershire sauce. (yummy!)
    5.  Pour half the sauce mixture into the bowl with the meatloaf mix.
    6.  Mix the meatloaf together with your hands.


    7.  Brush a 12-muffin tin (1/2-cup each) with vegetable oil or extra-virgin olive oil. (I would use Pam next time, because the EVOO made such a mess!!)
    8.  Use an ice cream scoop to help you fill meat into a each tin.


    9.  Top each meat loaf with a spoonful of extra sauce.


    10.  Bake about 20 minutes. (It took me 30) Cut open 1 muffin to test that the middle is cooked through. (or if using ground turkey, cook until 180 degrees)

    I would definitely try this recipe again with the few changes listed!


    Sunday, August 29, 2010

    Slow Cooked Chunky Tomato Sauce with Mushroom


    This is a recipe for a months worth of rich chunky tomato sauce. I realized today that most of what I cook is all guess work when it comes to measurements. The problem with that is, it doesn’t translate very well to a blog! So I broke out my measuring cups and spoons... And I am happy to tell you, that I finally have a recipe after years of making this sauce.  Anyone who has ever tried it, loves it. The mushrooms are optional, I’ve also made this by adding frozen spinach, zucchini or ground beef.  Enjoy!

    •  3 28oz Cans of Tomato Puree
    •  2 28oz Cans of Diced Tomato
    • 1 6oz Can on Tomato Paste 
    • 1 Whole Head of Garlic, minced 
    • 1 Large Onion, Diced
    • 9 Cups of Mushrooms, Quarter
    • 3 tbsp of Extra Virgin Olive Oil
    • 2 Cups of Parmesan Cheese
    • 1/4 Cup Splenda (or sugar)
    • 1 1/2 tbsp Dry Oregano
    • 3 tbsp Dry Parsley

    1. Turn crock-pot to high, add Tomato Puree, Paste and Diced Tomatoes to pot. 

     2. Heat EVOO in large pan. Saute onion and garlic until translucent.  Don't worry if the garlic turns green, it's perfectly normal!

    3. Turn heat to low, add mushrooms.  Cover and cook for 10 minutes, stir only once.


    4. Add Mushrooms, Parsley, Oregano, Splenda and Parmesan Cheese. Mix well.
    5. Mix well and cover. Cook for 1 hour on high, 7 hours on low (no need to stir).  Or 4 hours on high, stir once an hour.
    And in the end you will be left with a mushroom sauce that is so hearty and rich in flavor, your husband will say, "I keep forgetting this isn't a meat sauce," like mine did! So now you're saying to me, "what in the world am I supposed to do with all this leftover sauce?!"


    Here is what you need:
    4 Quart size bags
    4 (or 1 will be fine) Left over Chinese soup container

     Place bags into each container and wrap them around the top, making sure not to leave to much air.

    Ladle sauce into each container. I put 4 1/2 big spoonfuls in each bag, and still had enough for 1 more bag, but I figured we would eat this for lunch throughout the week.

    Remove each bag and seal, removing as much air as possible.


    Stack in freezer, and you now have enough homemade sauce for at least 4 effortless dinners!

    Saturday, August 28, 2010

    Menu Planning Saturday


    Every Saturday I am going to be cluing you in on what the plan is for the week ahead.  I will link any new recipes that I am not creating myself, and hopefully some of you will get inspired to try them with me!  I am an avid coupon shopper, so a big part of my menu planning will be influenced by the stockpile I have created and continue to build.
    • Sunday: Turkey Meatloaf Muffins, Baked Potatoes, Broccoli 
    • Monday: Zatarains Chicken Rice, Chicken breast, Zucchini   
    • TuesdayFlavorful Flounder , Grilled green beans, Salad 
    • Wednesday: Turkey Burgers, Salad 
    • Thursday: Pork Chops, Stuffing, Veggie
    • Friday:  Sausage Peppers and Onions 
    • SaturdayStuffed Shell , Salad  
    Cooking anything good this week? I’d love to hear about it!

    Thursday, August 26, 2010

    Begining our Journey

    My husband and I have decided to embark on a new journey.  Fast and easy is what we as a country have become accustomed to, including our household. Even though I am a housewife with a passion for cooking, we still find ourselves falling into the trap of convenience food.  Whether it be ordering pizza, having an expensive meal out, or even picking up a pre-made chicken at the supermarket, we are eating this way multiple times a week. For me, it is mostly out of laziness, because really how long does it take to cook an easy dinner? The delivery man isn't getting here any faster.  We have decided to leave the world of fast food, restaurants and take out behind. And are ready to change into people who wouldn't think about spending for something they could easily make cheaper (yummier and healthier) at home.  So starting today, for the next year, we will not spend one dollar on food that doesn't come from my kitchen.

    When we made the decision to give this a try, I wanted to go a little further.  I have been a home cook for about 6 years now, but within the last year or two, I have become obsessed with really learning how to cook.  Six years ago when I met my husband, I wouldn't even touch a piece of raw meat. He is the one who taught me the basic fundamentals of cooking.  Today, I can trim a pork shoulder with the best on them.  But being a young wife, I find that there are so many ingredients I haven't used, recipes I haven't tried and techniques that have gone unexplored!  So, I am going to use this as an opportunity to enhance my cooking and I hope that you follow me on my journey!